After the plugin, has been successfully installed and activated, you should see a new option in your WordPress dashboard’s main navigation menu.
From there, you can access the plugin’s settings. Upon clicking the menu, you will be taken to Redi Reservation’s Page where you can access different tabs. The Home page will be the Reservation list, from where you can see all pending, approved, rejected and upcoming reservations. We’ll cover this later in the guide.
To access the plugin’s settings, you can either click on the Settings or Settings $. You might be wondering about their difference. The Settings allows you to access the Free Package Settings, which includes the common settings, front-end settings, custom fields, restaurant settings, working time and email configuration, this is enough to accept reservations from your website. The Settings $ allows you to access the Basic Package Settings which will allow you to configure advanced settings such as seats by weekday, open times, blocked times, email templates and reply comments.
There’s also the Test reservation option in the Redi Reservations menu, which will allow you to preview and test the plugin itself. It’s useful for troubleshooting issues and tweaking your installation.
Finally, the Upcoming (Tablet PC) will allow you to see all of the upcoming reservations.
Now that you’ve got a basic understanding of Redi Reservation plugin, let’s go through each of the settings to help you understand how to use the plugin effectively.
You also can see the same features explained in video form:

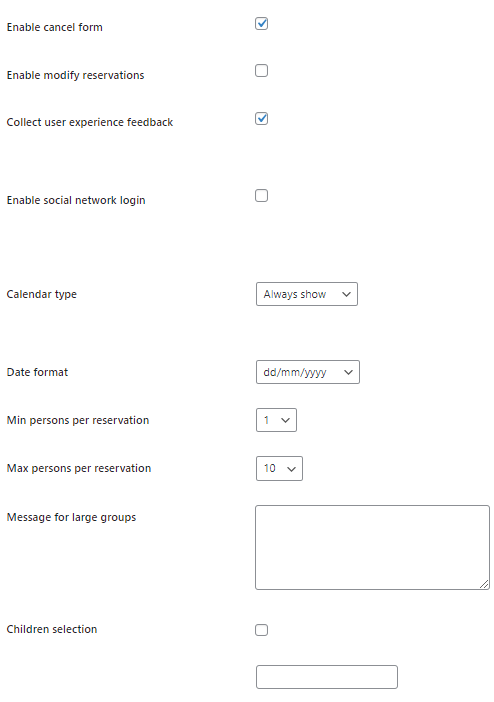
This block of settings controls how reservation form is presented on the screen

Enable Social network login - Enable or Disable social network account login. When enabled clients can login with any social network accounts like Facebook and then reservation form will be pre-filled with personal information. Also if user logins with social network but does not complete the reservation, he will receive a reminder to finalize it. You need to install and setup plugin with name 'Super Socializer' from WordPress directory.
Min persons per reservation – allows you to set the minimum number of guests allowed to make a reservation. You can choose from 1 to 10 minimum persons per reservation.
Max persons per reservation – sets the maximum number of guests per reservation, up to 500.
Common settings allow you to configure the basic features of your reservation form. You can set the following values:
Reservation time – how long will the guests be in your restaurant. It does not mean that your guest has to leave your restaurant, it is just a time that needs to be reserved in a system to make a decision on availability.
Manual reservation - if this box is checked, you will have to manually confirm all reservations submitted. This is a great way to avoid spam or control all incoming reservations. Once a reservation is submitted, you will receive an email with reservation request and the user will also receive an email message that notifies them about their pending reservation. From there, you can decide whether to confirm or reject a reservation right from the email message. Restaurant staff can also receive emails with a link that allows them to approve or reject a reservation and provide comments. It will also appear as pending on Tablet PC.
Alternative time step – allows you to define how complex reservation time can be. For example, if you choose 60 min, users can only reserve every hour such as 12 PM, 1 PM, 2 PM; for 30 min, users can select 12 PM, 12:30 PM, 1 PM, 1:30 PM and so on from available time options.
30 min time step
60 min time step
Send confirmation email to a client – Choosing “From ReservationDiary.eu” will cause the confirmation email to be sent out from “info@reservationdiary.eu”. Choosing “From WordPress email account” will cause the confirmation email to be sent out from your specified WordPress admin email. Choosing “Disable confirmation email” will disable the confirmation email and your client will not receive any confirmation email. Take note that the “From WordPress email account option” will only work for Basic package clients.
Early Bookings – users can only book reservations from this date plus the number of months they choose. For example, if you choose 1 month and today is March 13 and the user tries to reserve for April 21, then your form will show an error message:
Error message when the user tries to reserve for a date which is not within the scope
Message for large groups – is the message that will be shown if the user chooses a large number of people on the reservation page. When the user chooses more than the maximum number of people allowed, this message will appear.
Upon choosing “the more than X people”, the message appears.
Hide steps – When this is set to true, after the user selects a timeslot, the step 1 details will be automatically hidden.
Step 2, Step 1 is hidden because the hide steps option is set to true.
Calendar type – there are two options here that allow you to change how the calendar is displayed. The screenshot below shows the difference between the two types.
Always show
Show on click
Time picker type – there are two options here that allow you to change how the selections are displayed in the reservation form. The screenshots below show the difference between the two types.
jQuery
Dropdown
Support us - If the checkbox is checked, a logo of "Powered by ReDi" is displayed. Thank you for supporting us.
There are some settings that are not possible yet to change from the settings page but are possible to define in the configuration file
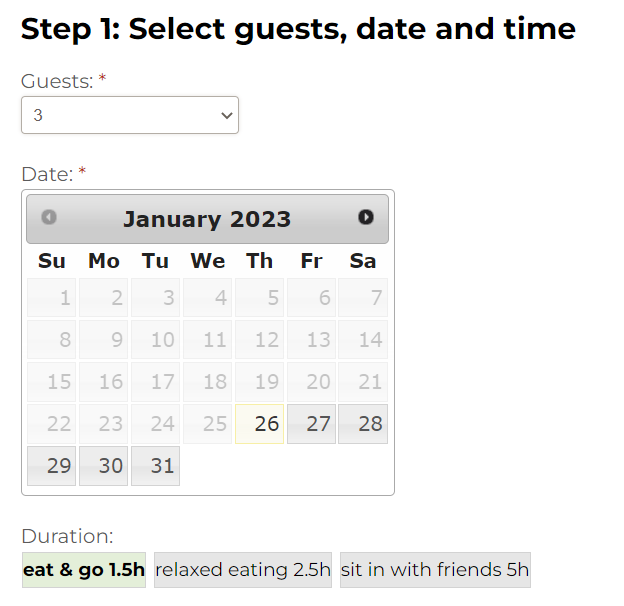
Seating duration - if defined, then guests can select seating duration from provided options

file: customduration.json
{
    "durations": [
        {
          "duration": "90",
          "name": "eat & go 1.5h"
        },
        {
          "duration": "150",
          "name": "relaxed eating 2.5h"
        },
        {
          "duration": "300",
          "name": "sit in with friends 5h"
        }
    ]
} |
Custom fields allow you to set additional items in step 2 of your reservation form.
The name field should describe what your custom field is for.
You can choose from either a textbox or a checkbox and whether it is required or not. When the “Is required?” option is checked, the user must fill up that particular field in order to submit the form.
If you purchase add-ons, you can get additional features such as the following:
Reminder – when this is checked, the user will receive SMS and email reminder.
Newsletter – this will allow us to ask the client whether they want to subscribe to your newsletter or not. This will also work with a MailChimp add-on. This will only send client information there if this box is checked.
Allow SMS – this will ask users whether they want to receive confirmations and reminders via SMS.
The required error message will appear if the user did not fill up a required field upon submitting the form.
Below shows the additional custom field and the error message associated with it when the user attempts to submit the form without filling up the required custom field.
Take note that the additional custom field will appear as a comment in the email as shown the image below. The other comment submitted using the default comments text box will appear last, after all of the custom fields have been listed.
The restaurant settings allow you to put in information about your restaurant such as the restaurant name, address and more.
Place – if you have the basic package, you can have multiple places. This is where you can select the place you want to edit settings.
Current Place ID – if you have multiple places, then you can have multiple pages that represent different places. If this is not specified, then a dropdown of all places is shown.
Restaurant Name is the name or restaurant.
Country, City, Address fields should be your physical restaurant’s address. Note that the restaurant name, country, city, and address will appear in the reservation email.
URL – the website address of the restaurant.
Email and Email CC – the email field is where all reservation request notifications will be submitted. You can also reject or approve any reservation requests directly via emails submitted to your provided email. Email CC, on the other hand, is just what it is: email address that will receive a copy of reservation requests other than your main email. Take note that those email addresses will also have the authority to accept or reject a reservation.
Phone number – your restaurant’s telephone number.
Short and long description – your restaurant’s short and long description.
Late bookings – setting this to 20 hours will set the earliest available reservation date and time to 20 hours from the current time. For example, if it’s January 23 at 1 PM in your current time, then the earliest available time slot in your reservation form will be January 24 at 9 AM.
Catalog – if this check box is checked, your restaurant details will be published to the catalog of reservationdiary.eu. If you do not want it to be published, keep the box unchecked.
Maximum number of guests – how many total guests your restaurant can accept at any given time. Please don’t reduce the number of guests unless you don’t have any active reservations. If you reduce this setting, then upcoming reservations will be deleted.
This is where you can specify your restaurant’s open hours in 24-hour format. So 2 PM should be written as 14:00, 3:00 PM as 15:00 and so on. If your restaurant is closed on a certain day, leave it blank. If you have more complex working time, please use Basic Package settings options. If restaurants close after midnight, then set closing time to 02:00 for same day.
Here, you can set the language and date format for in-house emails.
In this section, you can specify what type of date format you want to use. Below is an example of the Slash “dd/mm/yyyy” format.
Different date format choices.
How "dd/mm/yyyy" appears on the front-end.
Please provide this key to identify your account for troubleshooting.